


Hello coders!! Today we will discuss some concepts you need to know to build real complex applications with React and Redux.
In this article we'll cover the following concepts in detail:
- Why we need redux?
- What is Redux?
- Steps to create a React-redux application
- Step 1: Create a User Component
- Step 2: Create a Store
- Step 3: Create a Reducer
- Step 4: Share Redux Store with Components
- Step 5: Add an Async Function Middleware using Redux Thunk
- Step 6: Build an Action Creator
- Step 7: Connect redux store to components
Let's get started!! 🚀🚀
Why Redux?
Before we jump to more details of Redux first try to understand why we actually need it?
In a complex application with many components, if you want to share a state among the several components, then one approach you can think of is using props.
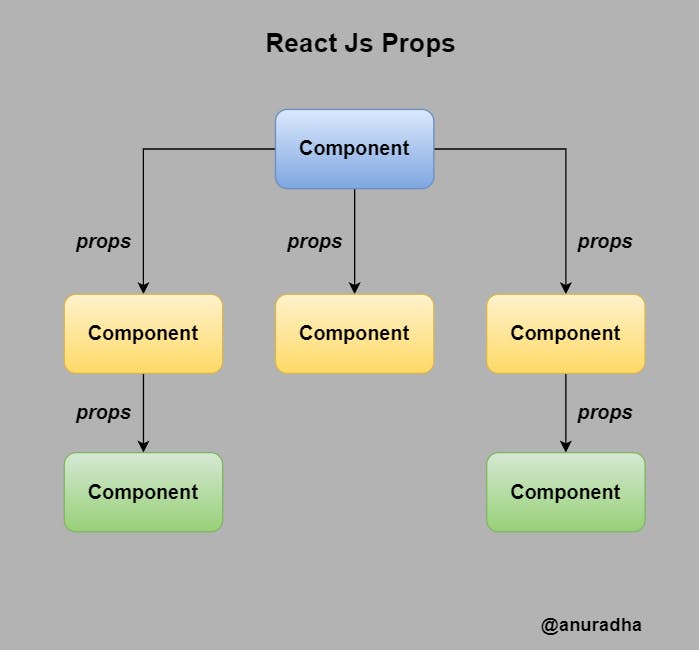
But props doesn't solve our problem completely as it only enables you to send data from a parent component to a child component using the top-down approach and not vice-versa. That means any change in the state that occurred in the child component does not impact the parent component's state.
Also, another problem that props failed to solve is to share the state among the components with no parent-child hierarchy.
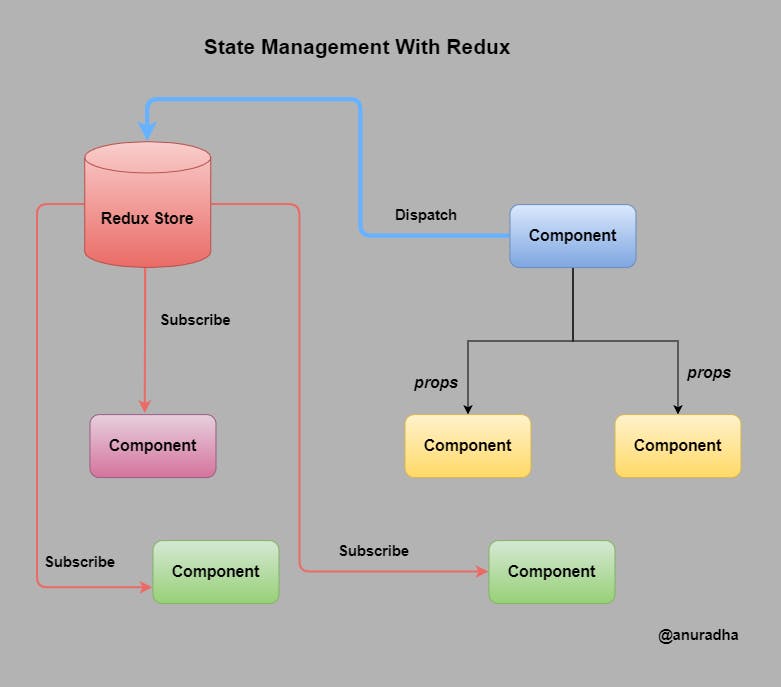
So, to overcome all the above problems and to synchronize the state across the components Redux comes into the picture. Using this approach we store all the state globally and all other components can access it.
Redux is an open-source JavaScript library for managing the application state.
What is Redux?
- Redux is basically used for state management.
- It can be used with all javascript frameworks & libraries like React, angular, etc.
Main Elements of Redux includes:-
- Store: If you are working on a large application, the state is separated from the React components into its own store. The store is the global component that stores the current state and it is an immutable object.
- Action: State in the store is not changed directly, but with different actions.
- Reducer: It is used to define the impact of the action on the state of the application.
- Subscribe: It is used to create a callback function the store calls when its state is changed.
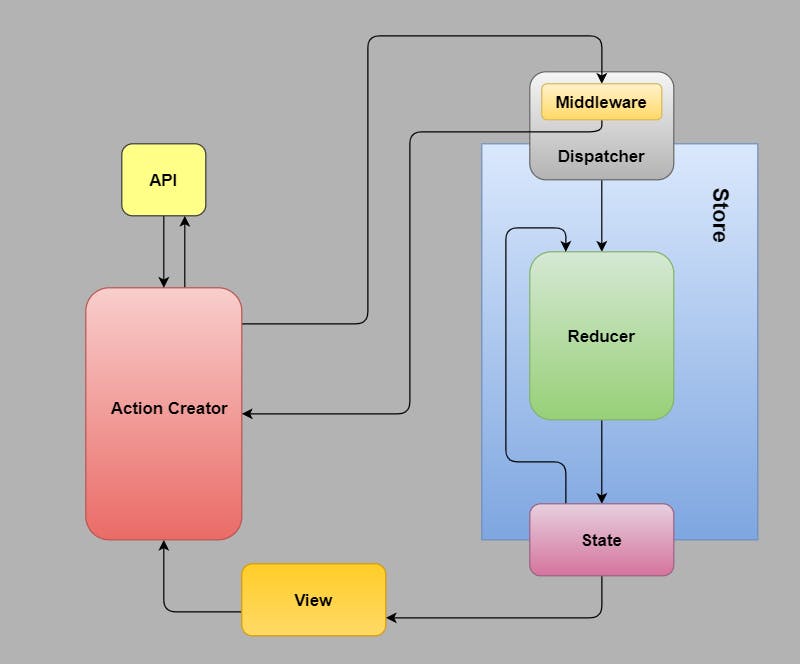
Redux Principles:
- The global state of your application is stored as an object inside a single store.
- The only way to change the state is to
dispatchan action. - Changes are made with pure reducer functions.
Let's explore each one of them in detail by using a simple example:
We'll follow the following Folder structure:
📦src
 ┣ 📂actions
 ┃ ┣ 📜types.js
 ┃ ┗ 📜users.js
 ┣ 📂components
 ┃ ┗ 📂Users
 ┃ ┃ ┣ 📜index.js
 ┃ ┃ ┗ 📜user.css
 ┣ 📂reducers
 ┃ ┣ 📜index.js
 ┃ ┗ 📜users.js
 ┣ 📂store
 ┃ ┗ 📜index.js
 ┣ 📜App.js
 ┗ 📜index.js
You can find the final code in my github repo
Now we will create an application that fetches user data using REST APIs and display it using Redux.
In the end, our application will look like this:
Create a React application and install redux using npm install react-redux --save.
Step 1: Create a User Component
In src/components/Users/index.js file:
import React, { useEffect, useState } from 'react';
import './user.css';

export default function Users() {

    const [userDetails, setUserDetails] = useState([]);

    const handleButtonClick = () => {
        // make a call to Action Creator
    }

    return (
        <div className="container">

            <button className="btn" value="click me" onClick={handleButtonClick}>
                 Fetch Data
            </button>

            <table>
                <tbody>
                    <tr>
                        <th>Id</th>
                        <th>Name</th>
                        <th>Phone</th>
                        <th>Email</th>
                        <th>Website</th>
                    </tr>
                    {
                        userDetails && userDetails.map((item, key) => {
                            return (
                                <tr>
                                    <td>{item.id}</td>
                                    <td>{item.name}</td>
                                    <td>{item.phone}</td>
                                    <td>{item.email}</td>
                                    <td>{item.website}</td>
                                </tr>
                            )
                        })
                    }
                </tbody>
            </table>
        </div>
    )
}
In the above code, we'll make an API call to fetch our data using REST API whenever a user clicks on the button and display the data in table format.
But before making an API call let's set up our store first.
Step 2: Create a Store
we'll create a Redux store in src/store/index.js file:
import { createStore } from "redux";
import rootReducer from "../reducers";

const preloadedState = {};

const store = createStore(
    rootReducer,
    preloadedState
);

export default store;
- The Redux core library has a createStore API that will create the store.
- We'll pass our rootReducer that we'll create in the next step as an argument.
- createStore can also accept a preloadedState value as its second argument. You could use this to add initial data when the store is created.
Points to remember:
- The store basically brings together the
state,actions, andreducersthat make up your app. - You can only have a single store in a Redux application.
- Every Redux store has a single root reducer function.
Step 3: Create a Reducer
- Reducers basically tell us how to update the state based on the action performed.
- It must be pure functions & should not produce any side effects.
- It must be composed of immutable objects. If there is a change in the state, the old object is not changed, but it is replaced with a new, changed object.
Let's create our reducer in src/reducers/user.js:
import { USER_DETAILS } from '../actions/types';

const initialState = {
  userDetails: {}
}

export default function (state = initialState, action) {

  console.log("Step 4: Inside User Reducer after action creator dispatches an action");
  switch (action.type) {
    case USER_DETAILS:
      return {
        ...state,
        userDetails: action.payload,
      };
    default:
      return state;
  }
}
It is a function that is given the current state and an action as a parameter it returns a new state.
Now we have created one reducer but as our application becomes more complex we may need to introduce more reducers.
So in this case, we'll create the main root Reducer which will combine all other reducers used in our application.
In src/reducers/index.js file:
import { combineReducers } from "redux";
import userReducer from "./users";

export default combineReducers({
    userReducer: userReducer,
   //other reducers
});
we can create the actual reducer for our application by combining the two or many existing reducers with the combineReducers function.
The combineReducer works in such a way that every action gets handled in every part of the combined reducer. Typically only one reducer is interested in any given action, but there are situations where multiple reducers change their respective parts of the state based on the same action.
Step 4: Share Redux Store with Components
As we have initially created our store, the next step is to make it available to all the components present in our application.
In src/App.js file:
import React from 'react';
import store from './store';
import { Provider } from 'react-redux';
import Users from './components/Users';

function App() {
  return (
    <Provider store={store}>
      <Users/>
      </Provider>
  );
}

export default App;
By using this way. all the components can access the store.
Step 5: Add an Async Function Middleware using Redux Thunk
After setting up the store, now we need to make an API call to fetch our data but before this, we will add middleware to our store which enables us to create an asynchronous action.
Redux Thunk
This library is a so-called redux-middleware, which must be initialized along with the initialization of the store.
Because of this, it is possible to define action-creators so that they return a function having the dispatch method of redux-store as its parameter.
As a result of this, one can make asynchronous action-creators, which first wait for some operations to finish, after which they then dispatch the real action.
To introduce redux-thunk into our application first install it using npm install --save redux-thunk.
Now in src/store/index.js file:
import { createStore, applyMiddleware, compose } from "redux";
import thunk from "redux-thunk";
import rootReducer from "../reducers";

const preloadedState = {};

const middleware = [thunk];
const composeEnhancers = window.__REDUX_DEVTOOLS_EXTENSION_COMPOSE__ || compose;

const store = createStore(
    rootReducer,
    preloadedState,
    composeEnhancers(
        applyMiddleware(...middleware)
    )
);

export default store;
As you noticed we introduce many new terms in the above code. Let's try to explore each one of them one by one.
compose
compose is an example of higher-order functions. It takes bunch of functions as arguments and returns a new function that is the composition of all these functions.
- It is used when you want to pass multiple store-enhancers to the store.
- It composes single-argument functions from right to left. The rightmost function can take multiple arguments as it provides the signature for the resulting composite function. for example:
compose(f, g, h)is identical to doing(...args) => f(g(h(...args))).
store enhancers
- They are higher-order functions that add some extra functionality to the store. The only store enhancer which is supplied with redux by default is applyMiddleware.
applyMiddleware
- Creates a store enhancer that applies middleware to the dispatch method of the Redux store. This is handy for a variety of tasks, such as expressing asynchronous actions in a concise manner or logging every action payload.
- Because middleware is potentially asynchronous, this should be the first store enhancer in the composition chain.
We'll see the use of dispatch in the next step.
Step 6: Build an Action Creator
Now it's time to make an action creator which fetches data using REST APIs.
Action creators are a pure function which creates action.
Actions are plain JS objects that have a type field and can contain additional data. It creates an event that describes something that happened in the application.
We'll declare all the type field in a separate file src/actions/types.js:
export const USER_DETAILS = 'USER_DETAILS';
To build an Action creator:-
In src/actions/user.js file:
import axios from "axios";
import { USER_DETAILS } from './types';

export const getUserDetails = () => async (dispatch) => {

    console.log("Step 2: Inside Action Creator to make an API call");
    const res = await axios.get('https://jsonplaceholder.typicode.com/users');

    console.log("Step 3: Dispatch an Action to update the state");
    dispatch({
        type: USER_DETAILS,
        payload: res
    })
}
In the above code snippet, we make an API call, and as soon as we get our response we dispatch the action so we can change the state.
The store now uses the reducer to handle actions, which are dispatched or 'sent' to the store with its dispatch method.
Step 7: Connect redux store to components
We have finally done with the store setup. We are one step away so just follow up 🤓🤓.
In src/components/Users/index.js file:
import React, { useEffect, useState } from 'react';
import { getUserDetails } from '../../actions/users';
import { connect } from "react-redux";
import './user.css';

function Users({ getUserDetails, userReducer }) {

    const [userDetails, setUserDetails] = useState([]);

    const handleButtonClick = () => {

        //make a call to the Action creator
        console.log("Step 1: Make a call to Action-creator from Users Component");
        getUserDetails();
    }

    useEffect(() => {

        // Update the UI as soon as we get our response through API call
        console.log("Step 5: Inside UseEffect of User Component to update the UI")
        setUserDetails(userReducer.userDetails.data);
    }, [userReducer.userDetails])

    return (
        <div className="container">
          .....
        </div>
    )
}

const mapStateToProps = (state) => ({
    userReducer: state.userReducer
});

const mapDispatchToProps = {
    getUserDetails
}

export default connect(mapStateToProps, mapDispatchToProps)(Users);
In the above code snippet, we share the redux store with components with the help of connect.
Higher-order components are a function that accepts a "regular" component as its parameter and returns a new "regular" component as its return value.
connect
connect method provided by react-redux is an example of Higher-order components.
connect method is used for transforming the "regular" React component so that the state of the Redux store can be "mapped" into the component's props.
It accepts two parameters:
mapStateToPropsandmapDispatchToProps.
mapStateToProps
It is a function that can be used for defining the props of the connected component that are based on the state of the Redux store.
mapDispatchToProps
- It is a JS object of action-creators functions passed to the connected components as props.
- The functions passed in mapDispatchToProps must be action creators, i.e. functions that returns Redux actions.
As you noticed how we can pass our action creators and redux state as a parameter to the Users component.
On button click, we invoke action-creator which makes an API call and update the redux state.
In useEffect we will monitor the change in redux state and update the UI with response data.
Finally, our React application with Redux is ready!!! 😎😎
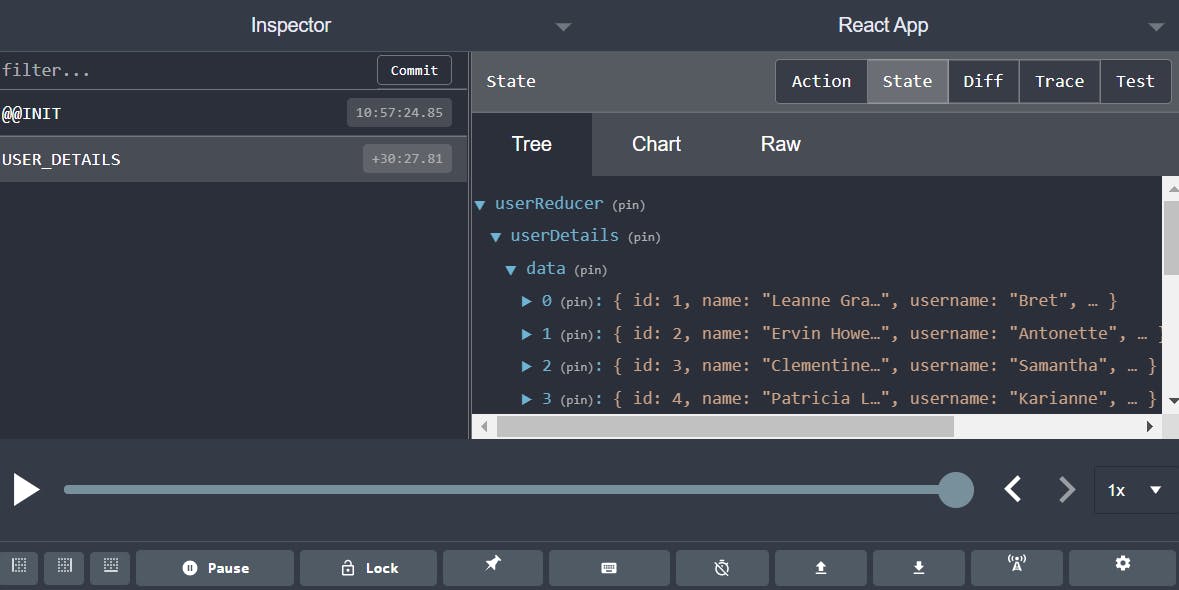
We can use the Redux Devtools to test and debug how Redux states are changing.
You can find the final code in my github repo
Wrap Up!!
Thank you for your time!! Let's connect to learn and grow together.
